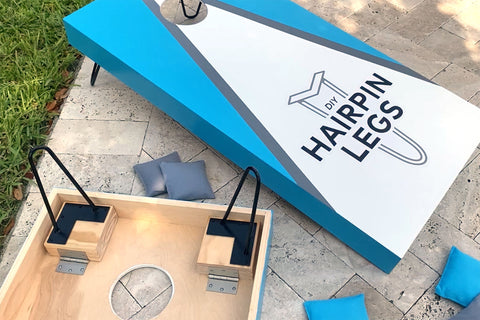
Ready to take your tailgate or outdoor gathering to the next level? In this DIY Hairpin Legs build, we're creating cornhole boards with hinged mounting blocks and collapsible hairpin legs. Rust-proof and ready for rain or shine, they're sure to last through the seasons. Game on!
Materials List
- 1 – Set of 4 DIY Hairpin Legs, 2-Rod Design, 3/8” thick, 9" in desired color
- 4 – DIY Hairpin Leg Floor Protectors (optional, but a good idea when playing on hard surfaces)
- 2 – 24" x 48" pieces of 1/2" or 3/4" plywood (or pre-cut cornhole board tops)
- 3 – 1" x 4" x 8' boards (we used pine), cut to size:
- 4 – 3/4" x 3.5" x 48"
- 4 – 3/4" x 3.5" x 22.5"
- 4 – Wood mounting blocks, cut to size (see Step 6 below)
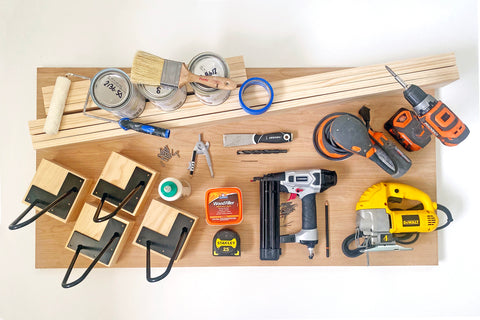
- Tape measure
- Compass (or nail and a string)
- Pencil
- Drill/driver and bits (we used a 1/2" wood drill bit to create a hole for our jigsaw, and a 5/64" bit to pre-drill our hairpin leg and hinge pilot holes, see below)
- Jigsaw
- Painters tape (optional, FrogTape worked better than blue for us)
- Wood glue (we used Titebond III Ultimate Wood Glue)
- Nail gun (or hammer and nail punch)
- Wood nails
- Wood putty and putty knife
- Palm/random orbital sander or sanding block (220-grit sandpaper)
- Damp rag (or rag with denatured alcohol) to wipe away dust
- 4 – 3" door hinges
- 24 – #8 x 1/2" wood screws for hinges (see below)
- 16 – #6 x 1-1/4" wood screws (included with your hairpin legs)
- Paint or finish of your choice (optional, we went with Behr exterior paint)
- UV-resistant exterior clear coat (Rust-Oleum Painter's Touch Ultra Cover Gloss Clear Paint made a nice finish)
- Paint roller, brush and/or foam brush
- 2 – Vinyl logos (optional)
- Squeegee or credit card to apply vinyl (optional)
Step 1: Measure & Size Your Cornhole Boards
Most cornhole boards are built to meet the American Cornhole Association's guidelines for regulation size boards. For this build, you'll create two 24-inch by 48-inch boards, and attach mounting blocks with nine-inch hairpin legs to the back corners to bring the height up to 12 inches.
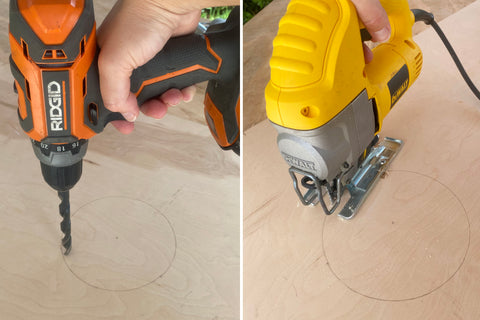
Step 2: Cut the Cornhole Board Holes
A six-inch hole saw can save you time if you plan on building a lot of boards. We went with a drill and jigsaw to keep things easy for our two boards. Start by drawing a six-inch diameter circle, with its center nine inches from the top of the board and 12 inches from the two sides.

Position your drill bit on the inside edge of the circle and drill through the board. Place your jigsaw blade inside the hole, and cut along the inside of the pencil line to create the hole. Sand the sides of the hole with a sanding block or sandpaper to remove rough edges.
Step 3: Assemble the Board Frames & Tops
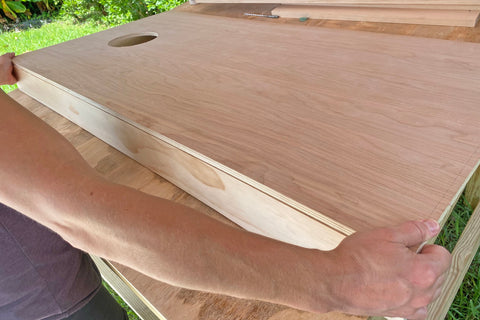
Assembly is simple, and even easier if you have someone to help you! Set your board pieces out, and lay a thin bead of wood glue along the top edge of one of your side pieces.
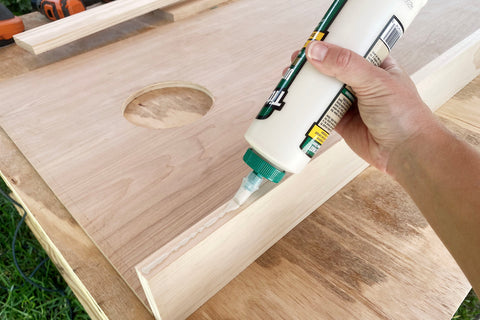
Gently lift the top of the cornhole board onto the top of the side, making sure that the outer edges are flush. Press the pieces together to help the glue adhere. Then use a nail gun to drive nails through the top of the board into the wood board below.
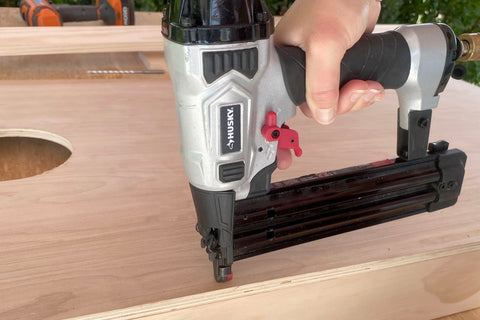
Work from one end of the board to the other, and check the alignment as you go to make sure things stay flush. Repeat until both boards are fully assembled.
Step 4: Prepare Your Wood Surface
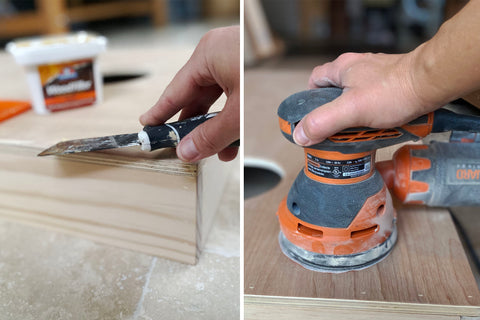
Use wood putty and a putty knife to cover the nail holes, and sand everything smooth using an orbital/palm sander or sanding blocks and 220-grit sandpaper. Wipe all surfaces with a damp rag or denatured alcohol to remove dust.
Step 5: Finish Your Surface
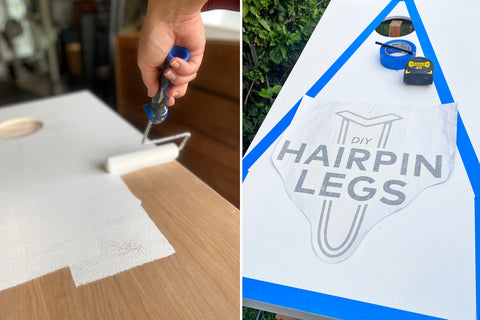
Now to add some character! You can stain or paint your cornhole boards or just clear coat them with a UV-resistant finish. We primed our boards first and used painters tape to mark off our paint areas. Both interior and exterior blue painters tape seemed to bleed, so we switched to FrogTape and saw cleaner, sharper lines. Be sure to allow time for paint to dry before peeling off your tape. Our vinyl logo decal measured approximately 17" wide.
After painting or staining your cornhole boards, you'll want to clear coat all the surfaces. If you're using vinyl decals, you'll apply a coat of clear finish prior to applying the decals and then another coat (or two) afterwards. Use a tape measure to position your decals in the same place on both boards. Tape one side of the decal to your cornhole board with painters tape so you can use it like a hinge as you peel the backing away. Smooth the vinyl and press any air bubbles out with a squeegee or credit card. You can work from top to bottom or outwards from the center. Slowly peel the front transfer tape away.

Step 6: Attach Hairpin Legs & Mounting Blocks
Next up, blocks. When sizing your blocks, consider the thickness of your plywood and Hairpin Leg Floor Protectors if you're using them (they add 1/4" height). The blocks should be wide enough for the hairpin leg base plate which is five inches square. We cut down a scrap 1" x 6" x 8' into 3/4" x 5.5" x 5.5" pieces that we stacked, glued and nail gunned together.
Position your hairpin legs on the blocks and mark the base plate holes with a pencil. Drill pilot holes over each pencil mark, using a drill bit that's slightly smaller in diameter than your screws without the threads (pre-drilling pilot holes helps to ensure you don't crack or damage your wood). Reposition the legs on top of the pilot holes and drive screws through the base plates to secure your hairpin legs. Repeat for all four legs.
Next, center your hinges on the sides of your mounting blocks and attach the hinges using the same pre-drill/reposition/fasten process. You can use longer screws to attach the hinges to the blocks, but use 1/2" for the cornhole board tops so you don't drill through your boards.
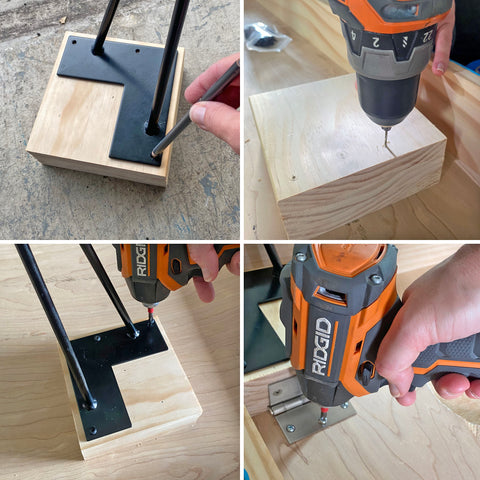
Be sure to check that your hairpin legs clear the sides of your boards when they fold down. If they don't, move them a little closer towards the center of your board before attaching the hinges to the underside of your board.
With that, there's only one thing left to do: play! Find a friend and while away a fun afternoon with this simple sport. We'd love to see pics or video of your DIY Hairpin Legs cornhole boards—share them with us on social!