If you're looking to organize supplies or materials (or need a junk drawer or two), an old metal cabinet can make an unexpected and unique fit. With a little imagination and elbow grease, you can transform a vintage find into something special that you're sure to enjoy and find useful for years to come.
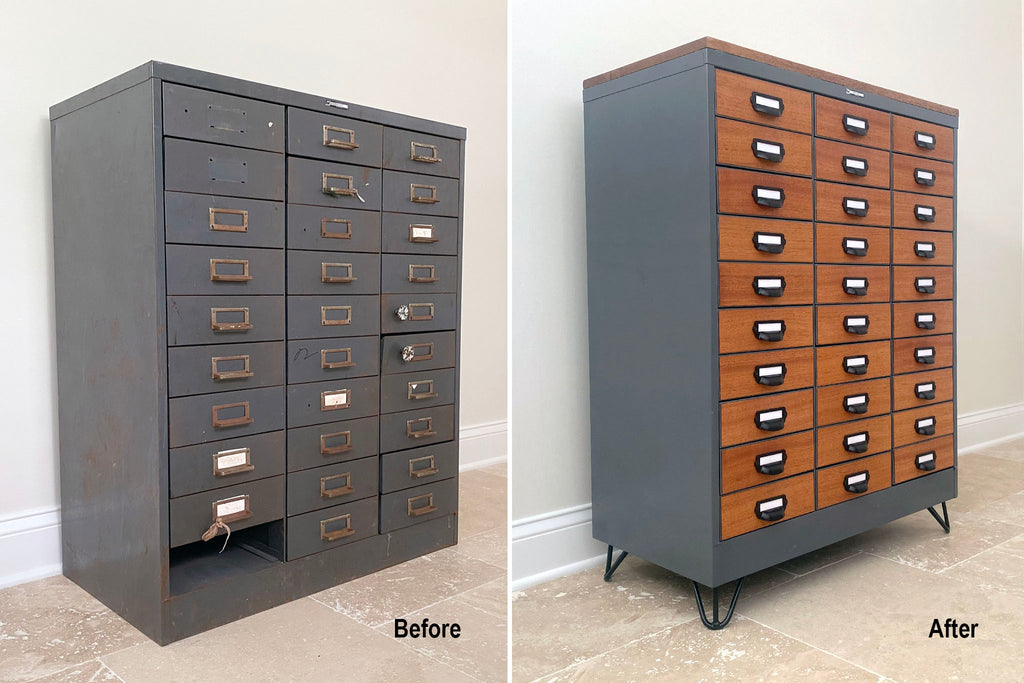
This Steelmaster metal cabinet was a mess of rust, mismatched hardware, and broken/missing drawers. After spotting it on the curb, we hauled it home before it could be picked up for scrap. With some fresh paint, a wood top and fronts, new drawer pulls, and a set of three-rod DIY Hairpin Legs, this industrial apothecary cabinet found new life as a stylish storage solution.

Materials List
Free or low-cost finds are the perfect way to stretch your budget and try new things. Here are some supplies that you'll need for upcycling an old metal cabinet. We've also included optional DIY tips and materials below.
- 1 – Set of 4 Hairpin Legs, 3-Rod Design in desired size and color (we opted for 4" in satin black with a 3/8" diameter)
- 4 – DIY Hairpin Leg Floor Protectors (optional)
- 1 – Metal cabinet
- Wood for top and fronts, cut to size (we went with oak and mahogany, see below)
- Drawer pulls and fasteners
- Sandpaper (220-grit is good for light sanding and finishing)
- Power sander (if needed for the cabinet)
- Acetone
- Metal primer, if needed (Rust-Oleum primer sealer spray paint works great)
- Metal paint or spray paint (Rust-Oleum 2X Paint + Primer in dark gray gloss produces a nice finish)
- Wood stain, polyurethane (or finish of your choice)
- Foam poly brush, paintbrush or clean rags (we love using old t-shirts)
- Tape measure
- Pencil
- Drill/driver with bits and screws
- Adhesives (Liquid Nails and Contact Cement work well for wood and metal)
Step 1: Prep & Paint Your Cabinet
First things first, remove the drawer pulls (we drilled through the old fasteners on ours to detach them), and use a vacuum to clean away dirt and debris. Wipe down your cabinet using warm soapy water and a clean rag or sponge.

An orbital sander makes quick work of scuffing up surfaces so paint adheres better. Depending upon the condition of your cabinet, you may be able to skip the sanding and go straight to priming or painting. Wipe things down with acetone for a clean surface, and be sure to use safety gear and work in a well-ventilated area.

Step 2: Select & Size the Wood Top & Fronts
You'll need a thick piece of wood for the top, and thin boards (or a veneer) for the drawer fronts. If you prefer cutting wood with a utility knife rather than a saw, opt for veneers or thin balsa wood from an arts and crafts store. Large sheets of veneers aren't typically available at home improvement stores, so you'll likely need to check online or visit a specialty wood store.
Initially, we had planned on using oak for the top, and a peel-and-stick oak veneer for the drawer fronts. But after spotting some gorgeous 1/16" mahogany at the specialty store, we just couldn't help ourselves. Given the $30 splurge, we decided to cut and edge-glue our top to offset the cost (see below).
DIY Tip: Cutting 1/16" Wood Down to Size
It's possible to cut 1/16" wood with a straightedge and utility knife, but it isn't easy and it isn't pretty. A better solution is using a table saw to make rip cuts (along the grain) and a miter/chop saw to make crosscuts (across the grain). Wrapping painters tape around your boards prior to cutting can help keep them from splitting at the edges.

DIY Tip: Creating a False Drawer (No One Will Ever Know the Difference)
If you're missing a drawer, you can look online or create a false drawer using scrap wood. Cut the wood down to the size of your drawer, about 0.75" thick, and paint it the same color as your cabinet. Add the drawer front and pull, then wedge it into the missing drawer space. You can hold it in place using painters tape, or opt for a more permanent solution such as a bracket spanning the top of the faux drawer and the cabinet drawer slide.

DIY Tip: Edge-Gluing a Wood Panel

When you're working on larger projects, it can be tough to find cost-effective solid wood surfaces. But worry not, you can create your own by edge-gluing boards together side by side into panels. Here's how:
- Choose a board that works for your project, and calculate cuts according to the actual size (don't use the rough-cut nominal size that's listed on the label). For our 0.75" x 16" x 30" oak top, we purchased a 1" x 6" x 8' board with an actual size of 0.75" x 5.5" x 8'. It gave us enough wood for three 0.75" x 5.5" x 30" boards, plus a little wiggle room left over.
- Cut your board down to equal lengths and lay the pieces side by side with the better-looking side facing up.
- Run a generous bead of wood glue along the edge (we used Titebond Ultimate Wood Glue). Slide the boards together.
- Clamp the boards tightly and use weights to keep boards flat as the glue dries. Wipe off excess glue before it dries.
- Once the glue is dry, remove the weights and clamps and sand the edges and sides of your board to create an even surface.
DIY Tip: Mounting Blocks
When selecting a metal cabinet for your project, it's best to look for pieces that have a bit of a base, so you can add mounting blocks and attach your hairpin legs easily without bumping into, say, a drawer. Mounting blocks will be hidden from view, so they don't need to be fancy. You'll want to use mounting blocks that are high enough to bring your hairpin legs into view (see step 4 below).
Step 3: Finish the Wood Top & Fronts
Finishes create a rich look and feel, while protecting surfaces for everyday use. Start by sanding your wood lightly with a fine-grit sandpaper such as 220-grit. Wipe the wood down with a damp rag and allow time to dry. Follow product instructions to apply an even finish, and sand in between coats. We used a simple Minwax Wipe-On Poly, but you can choose whatever finish you like.
![]()
If you're not sure what finish you want to go with, you can test different options on the back of your board. We applied two Old Masters mahogany gel stains to the back of our oak board with a rag, gently wiping the excess stain away before it dried. We set up three tests per stain: stain only, stain plus mineral spirits, and one stain layered on top of the other. While we achieved some good color options, they were no match for the natural hue and beautiful grain of the mahogany.

Step 4: Putting It All Together
After painting the cabinet and finishing your wood top and drawer fronts, it's time to put everything together. You'll want to choose adhesives and fasteners that are suitable for wood and metal. Here are some suggestions to get started. Your local hardware store can also help.
Adding Your Wood Cabinet Top
Liquid Nails Extreme Heavy Duty Construction Adhesive will ensure your cabinet top stays put—especially if you drive a few screws into the wood from the underside of your cabinet top. Load the Liquid Nails into a caulk gun and draw a bead along the sides of the surface, about 1" in from the edge. Add some extra Liquid Nails to the center areas as well.

Position your wood top and press it down firmly into the Liquid Nails. It will slide around, so ask someone to help you hold it steady while you drive screws through the underside of the cabinet into the board.

Attaching Wood to the Drawer Fronts
Many veneers are available in a peel-and-stick which makes application easy. When you need to use glue, your supplier can help with recommendations.
DAP Weldwood Contact Cement Construction Adhesive is a good choice for adhering 1/16" wood to the front of your drawers. It has a powerful smell, so be sure to use it outside. Place a good amount in the middle of each wood front and use a spreader paint multi-tool to brush it out evenly to the edge. Don't use too much as it will squeeze out through the sides, but you want to use enough so that it adheres properly.
With your drawer front facing up, center the wood over the drawer and press it down onto the metal. Apply carefully (it will want to move around). Press down on the corners and surface, then pull painters tape tightly across the metal and wood to help hold them together. When the contact cement is dry, you can remove the tape and wipe away excess adhesive with a rag or toothpick.
Attaching Your Drawer Pulls
For the drawer pulls, you'll want to use fasteners that are long enough to go through your wood and metal, without extending too far into your drawer. Center the drawer pulls on your drawer fronts, and mark the holes with a pencil. Remove the pulls and repeat. Next, pre-drill holes through the wood and metal (pre-drilling makes things easier and helps avoid damaging your surface). Use a drill bit that's slightly smaller in diameter than the diameter of your fastener.

After pre-drilling holes, reposition the drawer pulls and attach using appropriate fasteners.
Mounting DIY Hairpin Legs
DIY Hairpin Legs are easy to attach. For this project, you'll likely need to add mounting blocks to bring your DIY Hairpin Legs into view. Measure the height of your base for a cleaner look than our shoddy work below, and cut your blocks to size. You can attach your blocks to the cabinet using Liquid Nails and screws.
Next, position your DIY Hairpin Legs at the four corners of your cabinet. Mark the mounting holes with a pencil, and remove the hairpin legs. Pre-drill holes into your mounting blocks or cabinet base,reposition the legs and drive in your fasteners.

Once the hairpin legs are attached, check that they're secure. Have someone help you turn your cabinet right side up so you don't pull out the fasteners. That's it, you're all set. Share your creations with us on social media by tagging DIY Hairpin Legs. Happy organizing!
