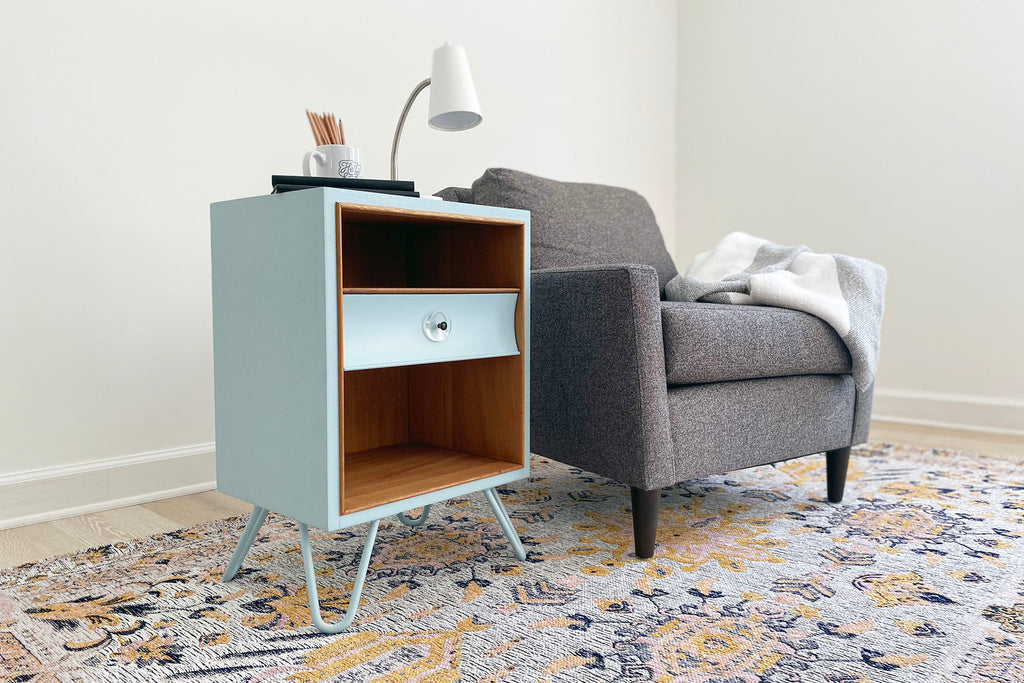
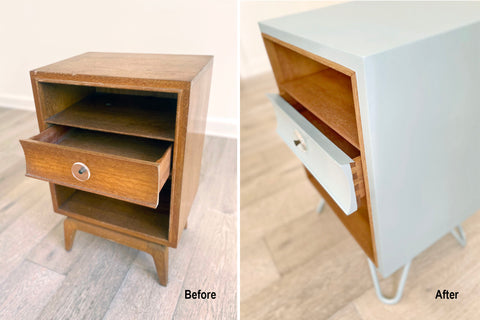
Sky blue, coral pink, pale yellow... any color is possible with our raw steel hairpin legs and a little spray paint. For this mid-century modern update, we brought back the beautiful wood grain of a $20 Modernage nightstand, and added some DIY Hairpin Legs character in a cool vintage blue. The result is a fun, sophisticated end table that cheers up any room. Grab some raw steel hairpin legs and a great vintage find—it's time to play with color!
Materials List
- 1 – Set of 4 Hairpin Legs, 2-Rod Design, raw steel in desired size (we selected 6", 1/2" diameter)
- 4 – DIY Hairpin Leg Floor Protectors (optional)
- 1 – Vintage nightstand or end table (check out our DIY tips below)
- Corner Cat Finish Sander and sanding sheets
- Sanding block and/or sandpaper (we went with 80-grit, 120-grit and 220-grit)
- Scuff pad
- Denatured alcohol or acetone
- Polyurethane or finish of your choice (we love Minwax Wipe-On Poly)
- Foam poly brush and clean rags
- Spray metal primer (Rust-Oleum Clean Metal Primer worked well)
- A few cans of spray paint (or paint and a paint sprayer)
- Tape measure
- Pencil
- Drill/driver with bits and screws (we used #8 x 3/4" pan head screws and a 5/64" bit, see below)
DIY Tip: Sourcing Vintage Furniture
With online marketplaces, thrift stores, estate sales, and trash-day throwaways, you never know where you'll find your next great piece. Here are some tips to keep in mind as you evaluate vintage finds for DIY Hairpin Legs projects.
- Hairpin-friendly base: Look for furniture that has easily removable legs or no legs at all.
- Solid wood: Solid wood works best for sanding, repairs and showcasing a beautiful wood grain. You want something that feels heavy, without any warping or peeling edges.
- Dovetail drawers: Dovetails aren't a must, but they hint at high-quality craftsmanship.
- Age: Old furniture is typically well made and worth the buy. Avoid refinishing rare or antique pieces as you'll decrease or destroy their value.
- Brand Name: Quality brands typically use quality craftsmanship and quality materials. A brand name can also help you track down a piece's story and value.
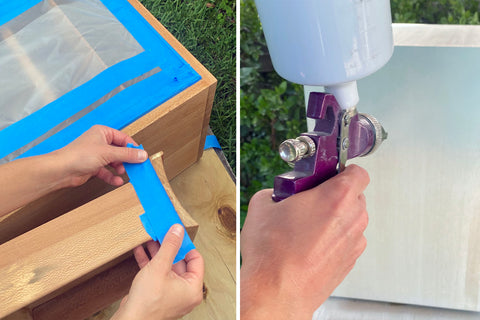
Step 1: Clean & Prep Your Furniture
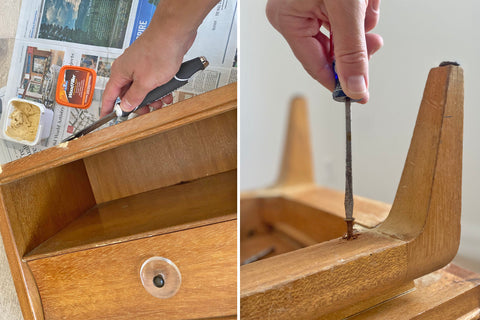
Ah, the "before" stage…so much potential, so much excitement! As you prep your piece, you may find you need to detach existing legs, make some repairs or do some light (or heavy) sanding. Our nightstand had two small dings in it, so we used wood filler and sandpaper to fix them. We were able to easily remove the original legs and drawer pull with a screwdriver.
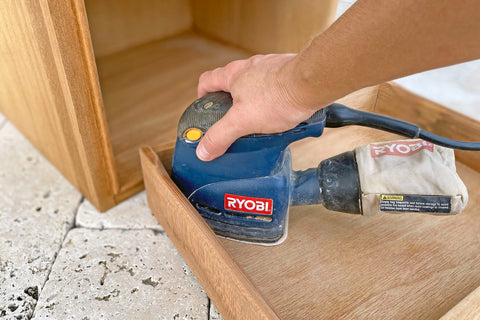
We then used 80-grit, 120-grit, and 220-grit, sanding from coarse to fine, one grit after another, to reveal the original unfinished wood. At first, we used an orbital palm sander, but quickly switched over to a corner cat to fit into tight corners. For the curved drawer front and smaller spaces, we wrapped a sanding block with sheets of sandpaper, and sanded areas by hand. Last but not least, we tore small pieces of sandpaper and gently sanded the curved border on the front and intricate details on the drawer sides. Oh so pretty...
With the sanding done, we used a vacuum, and denatured alcohol and a rag to wipe all the dust away.
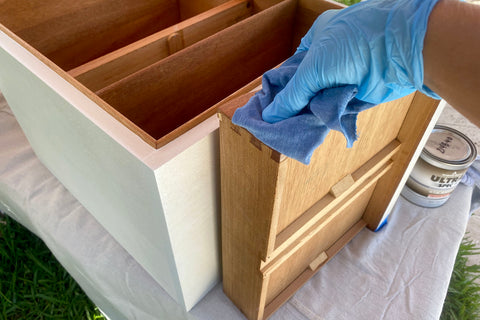
Step 2: Apply Wood Finish & Primer
Color pairs beautifully with the the warm tones of natural wood. To make your DIY life easier, choose finishes that don't drip or show brush strokes, and give you enough dry time to navigate small areas. We used a foam brush to apply Minwax Wipe-On Poly to the inside edges and corners, and a rag for larger areas. We sprayed primer on using a spray gun, but you can also brush or roll it on.
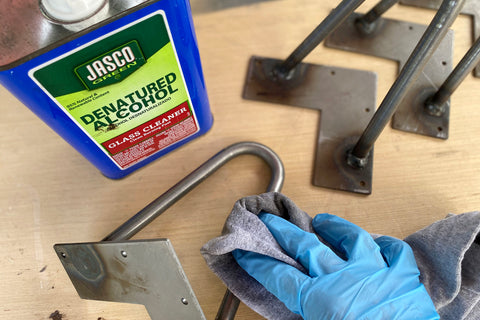
Step 3: Prep & Prime Your Hairpin Legs
Prepping your raw steel DIY Hairpin Legs is easy. Run a scuff pad along the surface of each leg, then wipe it down with denatured alcohol or acetone to remove any grease or dirt.
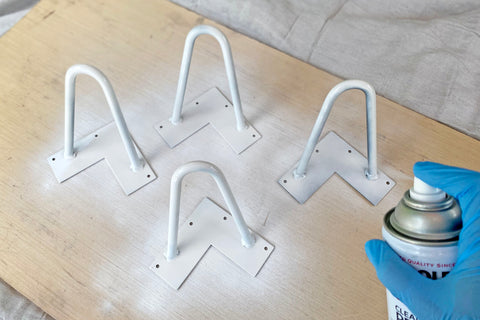
Spray the legs with a metal primer (we used Rust-Oleum Clean Metal Primer). The trick is to apply several thin coats, rather than trying to lay down a full coat of coverage all at once. If you get some drips, you can wipe them away with a rag, or sand them down when dry.We found it helpful to start with the interior U shape of each leg, then turn it over to finish painting.
Step 4: Add Color with Spray Paint
You'll want to use paint that's suitable for wood and metal, and can be easily applied and cleaned up using your preferred method.
*Note: Don't use a foam brush or paint brush to paint your raw steel legs. We tried it, it just doesn't work.
Spray paint is the easiest option, but the old rattle spray paint cans can be a little limiting in terms of color selection, even coverage, and cost. If you plan on doing a lot of projects, it can be worth exploring a high volume, low pressure (HVLP) spray gun/air compressor combo, or a plug-in sprayer such as the Wagner FLEXIO 3000. Both are useful in applying primer, paint, and different finishes.
We used an HVLP spray gun with Benjamin Moore Ultra Spec FP D.T.M. Acrylic Low Lustre Enamel in Colorado Gray. We also tried out pink (Honey Hut) and yellow (Golden Straw) to see how the colors looked when applied to raw steel hairpin legs—ooh la la!

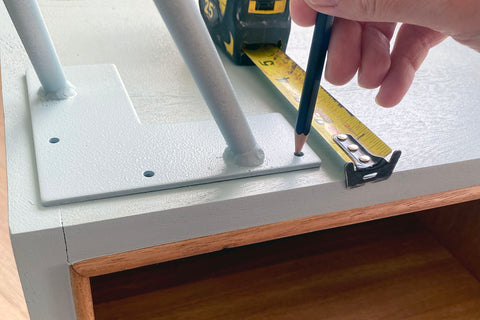
Step 5: Attach Your Hairpin Legs
With your furniture and hairpin legs looking great, you're ready for assembly. Turn your furniture upside down, and use a tape measure to position each hairpin leg on your furniture base. Mark each mounting hole with a pencil, and remove the legs.
Pre-drilling pilot holes helps ensure you don't crack or damage your furniture. Choose a drill bit that's a bit smaller than the diameter of your screw without the threads. One way to do this is by holding different drill bits up against your screw to find the right size. With our #8 screws, we opted for a 5/64" bit.
The length of your screws or fasteners should be shorter than the thickness of your hairpin leg base and the base of your furniture. Use painters tape to mark off your drill bit, so you don't inadvertently drill too far down.
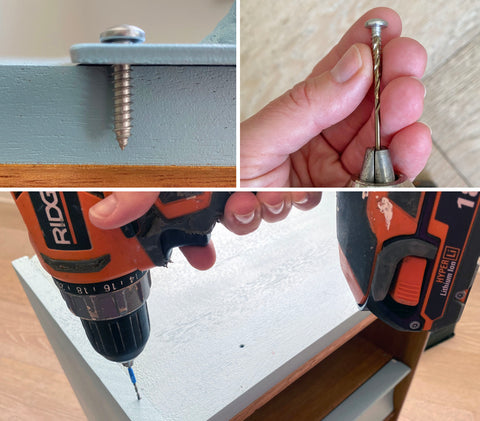
Once all your pilot holes are drilled, reposition the hairpin legs and attach them using your screws or fasteners.
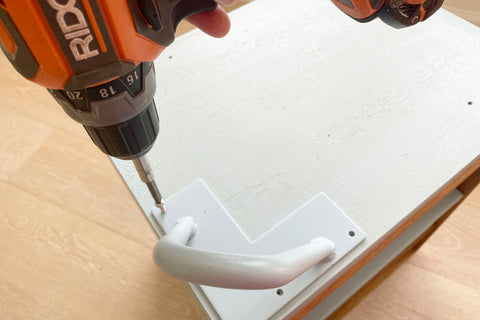
Turn your end table right side up and that's it—success! How did your color-infused build turn out? Share your creations with us @diyhairpinlegs. We love seeing what you come up with, and sharing inspiration and tips with our DIY maker community.